Laying out dots on a dice using display:flex & pseudo-classes
:nth-child, :is, :not, and wacky combinations thereof in an effort to display one, two, three, four, five or six pips in three rows and three columns

I love experimenting with cubes - and to each time somehow embelish the six faces of this beautiful but simple form. I experiment with colors, gradients, filters, mix-blend-modes, patterns, etc. This week I tried making a dice:
In the process, getting the right number of pips to appear on each face was actually the most fun of it all. I used a grid template of three columns and three rows, and hid the dots that I didn't need.
But it was rather quick and easy. So I thought:
Let's do that using display: flex!
For this tutorial we're going to go 2D - so you can see all the faces at all times. Instead of making a full-blown cube, let's lay out the six faces in two rows of three.
Also, whereas in my demo the 9 dots were nested directly in the face - and the display: grid handled arranging them into a 3x3, for display: flex we'll need to first divide the face into 3 rows, and place 3 dots in each.
Making use of Emmet - supported by VScode and Codepen - you can quickly spawn the .dice of 6 .faces, each containing 3 .rows of 3 .dots, just by typing in:
.dice>.face*6>.row*3>.dot*3
Notice we're not naming the faces. In my original pen I gave each of them an explicit id naming the number of dots on it. But as you'll see, we don't really need to.
body {
  height: 100vh;
  margin: 0;
  background-color: #000; /* hex code for black */
  font-size: .8vmin; /* it's not for text, it's for using the font-size unit of 'em' for sizing containers */
  place-items: center; /* centers the content vertically and horizontally*/
}

body, .dice {
  display: grid; /* on the body it's for centering items, on the others it's for setting up grid rows and columns */
}

.dice {
  grid-template-columns: repeat(3, 1fr); /* three even columns */
  grid-template-rows: repeat(2, 1fr); /* two even rows */
}

.face, .row {
  display: flex; /* only these will require flex for our purposes */
}

.face {
  flex-direction: column; /* arranging the sets of 3 dots into a stack of 3 rows*/
  background-color: hsl(calc(60deg*var(--step)) 100% 50%);
  grid-template-rows: repeat(3, 1fr); /* three even rows */
  grid-template-columns: repeat(3, 1fr); /* three even columns */
  width: 30em;
  aspect-ratio: 1; /* height equals width */
  margin: 30px;
  position: relative; /* this makes .face the point of reference for its children */

}

.row {
  position: relative; /* this makes .face the point of reference for its children */
  aspect-ratio: 3; /* the width is 100% of the .dice's width, the height is a third of that  */
}

.face:nth-child(1) { --step: 0; }
.face:nth-child(2) { --step: 1; }
.face:nth-child(3) { --step: 2; }
.face:nth-child(4) { --step: 3; }
.face:nth-child(5) { --step: 4; }
.face:nth-child(6) { --step: 5; }

.dot {
  aspect-ratio: 1; /* the height is 100% of the .row's height (which is a third of the .face's height); this makes .dot a square that is a third of the .face's length and width */
  background-image: radial-gradient(#fff 25%, #fff0 0); /* creating a small dot in the middle of the square using gradients (but there are other ways to do this) */
  mix-blend-mode: difference;
}
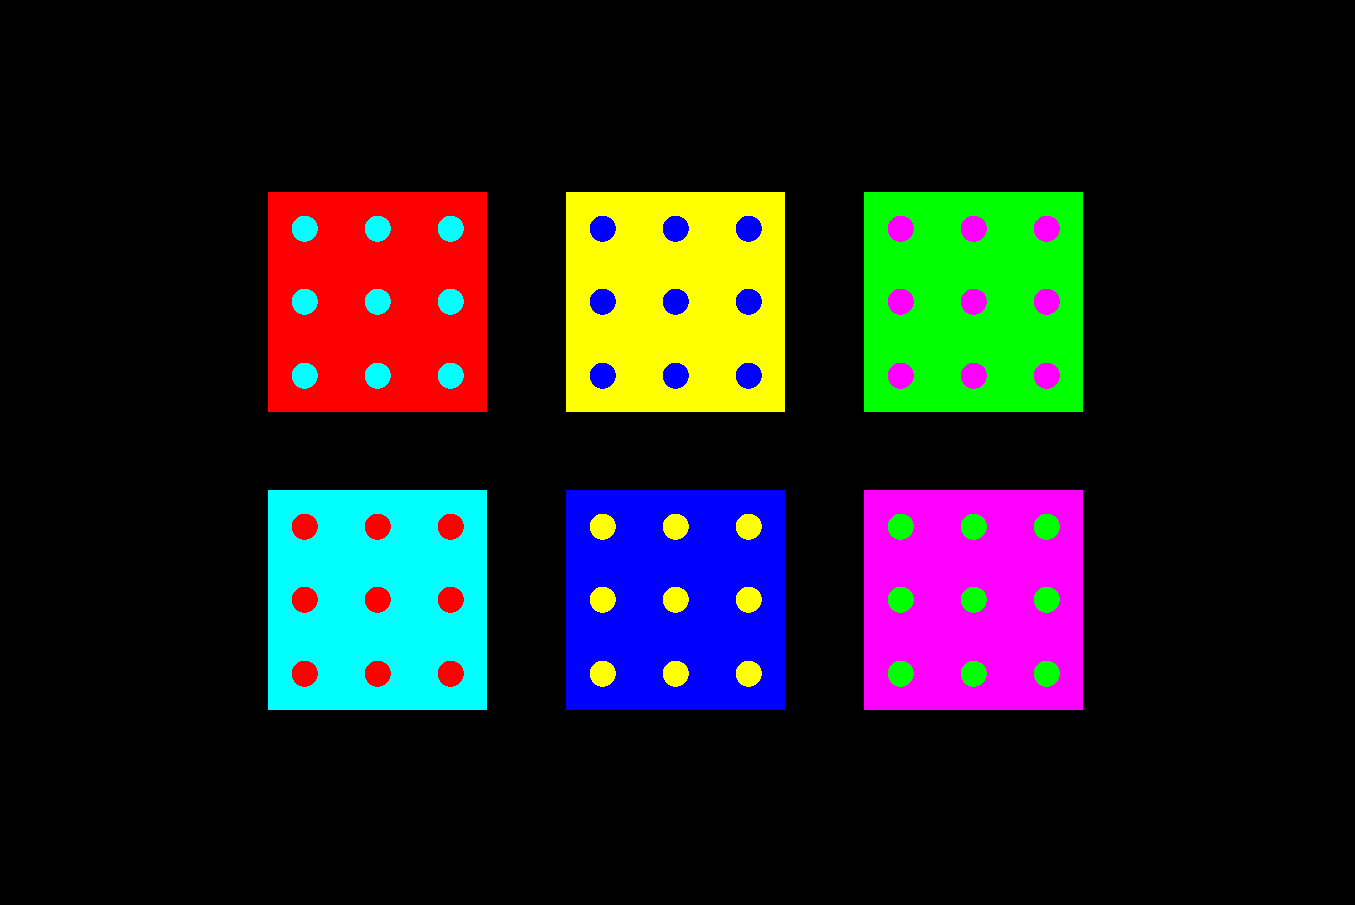
This ought to produce this horrendously vibrant set of six faces - nine dots on each, arranged in a 3x3 grid.
You should be seeing something like this.
Alternatively, you can try this demo and code along using that:
We'll target each of these individually and use selectors and pseudo-classes to try and display the correct number of dots.
Also, to hide the pips we don't need, we'll be using visibility: hidden - not display: none. See, the latter would wipe the targeted elements from the grid and break the intended layout. The former just hides the element, but leaves it there, as if transparent, but still holding its position, occupying the space.
Let's start with
One
In the demo I went for the simplest, quickest way to target the .dot at the center of the 3x3 grid of the .face:
#one .dot:not(:nth-child(5)) {
  visibility: hidden;
}
What this does is explicitly target the fifth .dot (out of nine) - or, rather, everything but that fifth dot. By default, all dots are visible. We need our central fifth dot to stay that way - and hide everything else.
In our new setup, using display: flex rather than grid, we need to do things differently - but the goal stays the same: target the dot at the center. So we first need to hit the .row that's in the middle (ergo, the second one) and then the .dot at its center (again, the second one).
.face:nth-child(1) .row:nth-child(2) .dot:nth-child(2) {
  visibility: hidden;
}
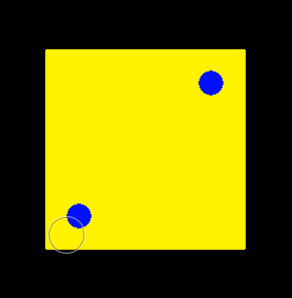
This does the trick. Kinda: we hit the central dot of the central row... and removed it.
To the rescue comes the :not pseudo-class - which will help us specify what we don't want.
But it's tricky - and depending on the way you intertwine it with other pseudo-classes, you'll get different results.
Targetting the second .row like this:
.face:nth-child(1) .row:not(:nth-child(2)) .dot:nth-child(2) {
  visibility: hidden;
}
erases only the central dots on rows 1 and 3:
Targetting both the second .row and the second .dot:
.face:nth-child(1) .row:not(:nth-child(2)) .dot:not(:nth-child(2)) {
  visibility: hidden;
}
isn't it, either:
It deleted dots 1 and 3 on row 1 and 3:
How about just the second dot, then?
.face:nth-child(1) .row:nth-child(2) .dot:not(:nth-child(2)) {
  visibility: hidden;
}
Nope.

Predictably, it hid dot 1 and 3 on row 2.
No, we clearly need both - and we need to tie them together somehow.
Sadly, attempts at concatenating them like this:
.face:nth-child(1) .row:not(:nth-child(2)).dot:not(:nth-child(2)) {
  visibility: hidden;
}
yield nothing.
Luckily, there's another way we can combine the pseudo-classes. Let's rewrite the bit of code that most closely resembles what we want: the one targetting the 2nd .row and 2nd .dot:
.face:nth-child(1) :not(.row:nth-child(2)) :not(.dot:nth-child(2)) {
  visibility: hidden;
}
Wrapping the :not pseudo-class around the whole selector rather than its :nth-child(2) pseudo-class is possible - and produces the same result:
And just when you're starting to ask what we're even doing here, you try concatenating:
.face:nth-child(1) :not(.row:nth-child(2)):not(.dot:nth-child(2)) {
  visibility: hidden;
}
and a mircacle happens:

Don't ask me how or why. It just does, OK?
What's even crazier, though, is this could be achieved faster - thanks to how the setup was structured. We're trying to hit the second .dot in the second .row. Both second elements - and while we've been targetting each of them specifically, by class, we can generalize a bit, and also avoid repeating ourselves:
.face:nth-child(1) :not(div:nth-child(2)) {
  visibility: hidden;
}
This does the trick just as well. As does this:
.face:nth-child(1) div:not(:nth-child(2)) {
  visibility: hidden;
}
Sometimes you have to go to extreme ways to arrive at simple, elegant solutions like this.
Also, I got another while trying to work on the .face with two pips:
.face:nth-child(1) div:nth-child(2n+1) {
  visibility: hidden;
}
This hides odd divs - in our case: the first and last row, and first and last dot on row 2.
Speaking of which:
Two
For this one, we need to target one pip in the top left corner - and another in the opposite corner: bottom right. The simplest way to do this would be:
.face:nth-child(2) .row:nth-child(1) .dot:nth-child(1),
.face:nth-child(2) .row:nth-child(3) .dot:nth-child(3){
  visibility: hidden;
}
which explicitly targets the first .dot in the first .row and the third .dot in the third .row - resulting in this:
Before we adress the elephant in the room - the fact that we want the reverse of this - let's try something else. Our code is kinda long and repetitive. Can we do something to shorten it? Like, target the element type rather than class - so we don't have to repeat :nth-child() for both?
.face:nth-child(2) div:nth-child(1),
.face:nth-child(2) div:nth-child(3){
  visibility: hidden;
}
Nope. That's also 1:

and also a longer version of my failed attempt at 2 from before:
.face:nth-child(1) div:nth-child(2n+1) {
  visibility: hidden;
}
OK, so how about we replace 1 and 3 with 2n+1 so we only need to state the whole combination once?
.face:nth-child(2) .row:nth-child(2n+1) .dot:nth-child(2n+1){
  visibility: hidden;
}
No, we did this before, too:

This, however, should be helpful when we get to 4.
OK, so let's try :not on all classes:
.face:nth-child(2) :not(.row:nth-child(1)) :not(.dot:nth-child(1)),
.face:nth-child(2) :not(.row:nth-child(3)) :not(.dot:nth-child(3)){
  visibility: hidden;
}
Yup, that works:
It also appears that wrapping :not around the class works just as well as wrapping it around just the :nth-child pseudoclass:
.face:nth-child(2) .row:not(:nth-child(1)) .dot:not(:nth-child(1)),
.face:nth-child(2) .row:not(:nth-child(3)) .dot:not(:nth-child(3)){
  visibility: hidden;
}
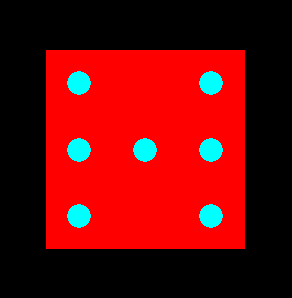
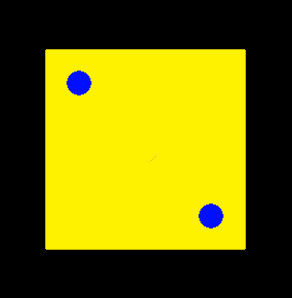
The unintended effect - in either version - is that whereas originally the top left and bottom right pips were hidden, applying :not flipped it around, and now the top right and bottom left are the only ones visible. We can fix that by modifying which nth-child of the .dots is targeted, switching 1 to 3 and conversely:
.face:nth-child(2) .row:not(:nth-child(1)) .dot:not(:nth-child(3)),
.face:nth-child(2) .row:not(:nth-child(3)) .dot:not(:nth-child(1)){
  visibility: hidden;
}
Three
This one is really disappointing. You'd think there's a quick way to target the same :nth-children on .row and .dot - first dot on first row, second dot on second row, and third dot on third row - like this:
.face:nth-child(3) .row:nth-child(n) .dot:nth-child(n)
 {
  visibility: hidden;
}
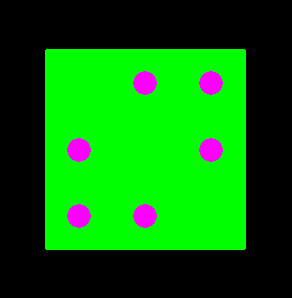
But that's not how n works. The n's don't seem to coordinate: the n on .row:nth-child seems in no way related to the n on .dot:nth-child - and what happens is all rows and all dots are targeted, and we get this:

So, to hit only the right ones, we need to name the nth-children explicitly:
.face:nth-child(3) .row:nth-child(1) .dot:nth-child(1),
.face:nth-child(3) .row:nth-child(2) .dot:nth-child(2),
.face:nth-child(3) .row:nth-child(3) .dot:nth-child(3) {
  visibility: hidden;
}
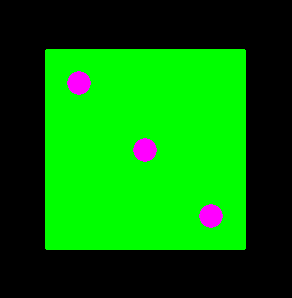
From there, it's fortunately quite easy to reverse which dots are hidden - by :not-ing only the .dots:
.face:nth-child(3) .row:nth-child(1) :not(.dot:nth-child(1)),
.face:nth-child(3) .row:nth-child(2) :not(.dot:nth-child(2)),
.face:nth-child(3) .row:nth-child(3) :not(.dot:nth-child(3)) {
  visibility: hidden;
}
I also take some comfort in the fact that at least you can eliminate some repetition using the :is pseudo-class:
.face:nth-child(3) :is(
  .row:nth-child(1) :not(.dot:nth-child(1)),
  .row:nth-child(2) :not(.dot:nth-child(2)),
  .row:nth-child(3) :not(.dot:nth-child(3))
)
{
  visibility: hidden;
}
What this does is state the selector that doesn't change just once at the beginning, followed by :is() - and within the parentheses put all the bits that have some variation to them, separated by commas).
And yes, I tried that for two pips, too - but that didn't work. :is and :not seemed not to like being either the direct descendant or the parent of the other.
Four
We already got halfway there - with:
.face:nth-child(2) .row:nth-child(2n+1) .dot:nth-child(2n+1){
  visibility: hidden;
}
and before that, with:
.face:nth-child(1) :not(.row:nth-child(2)) :not(.dot:nth-child(2)) {
  visibility: hidden;
}
These two seem to be doing the reverse of what we want in two different ways - either by targetting :nth-child(2n+1) or :not(:nth-child(2)) - ergo, an odd number, or not 2. So we need to target the opposite of either of those.
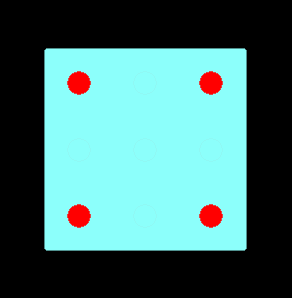
The funny thing that happens when you un-:not the second variant (the red face with cyan pips) like this:
.face:nth-child(4) .row:nth-child(2) .dot:nth-child(2) {
  visibility: hidden;
}
you get this:

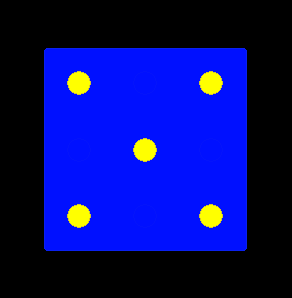
Same when you replace :nth-child(2n+1) with 2 - or 2n (same thing, no more even numbers to target). Applying :not to variant 1 (yellow face, blue pips):
.face:nth-child(4) .row:not(:nth-child(2n+1)) .dot:not(:nth-child(2n+1)) {
  visibility: hidden;
}
results in the same.
So what do we do to hit the second dot on rows 1 and 3, and the whole second row?
Hit the element, not the class:
.face:nth-child(4) div:nth-child(2n) {
  visibility: hidden;
}
We did something similar for 1:
.face:nth-child(1) div:nth-child(2n+1) {
  visibility: hidden;
}
There, we needed to clear the odd rows and odd dots on the even row. Here we wanted the inverse: clear the even row and even dots on odd rows - and that's what exactly the code did:
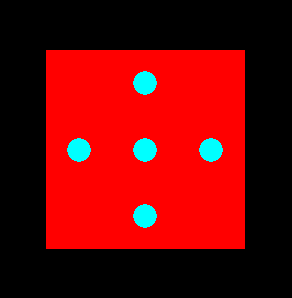
Five
With five it won't be as smooth - but not as bad as we had it with 3. Basically, we need to hit the second dot on rows 1 and 3, and dots 1 and 3 on row 2. But I'm being unnecessarily blunt and explicit here. We can also generalize: 1 and 3 are odd numbers and we can reference them as such, no problem:
.face:nth-child(5) .row:nth-child(2n+1) .dot:nth-child(2n),
.face:nth-child(5) .row:nth-child(2n) .dot:nth-child(2n+1){
  visibility: hidden
}
As expected, this clears even dots on odd rows and odd dots on the even row:
We can also shorten our code by :is-ifying the redundant repetition:
.face:nth-child(5) :is(
  .row:nth-child(2n+1) .dot:nth-child(2n),
  .row:nth-child(2n) .dot:nth-child(2n+1)
) {
  visibility: hidden
}
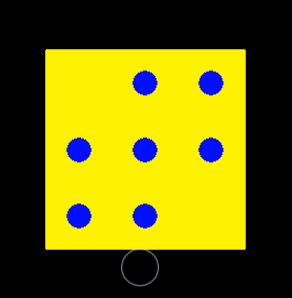
Six
The shorten and sweetest of them all: target just the second dot on each row:
.face:nth-child(6) .dot:nth-child(2) {
  visibility: hidden;
}
No unpleasant surprises there:

And so we have a full set of 6 faces with the correct number of dots - using display: flex. I think I had more fun with this than I did with display: grid that I used in the demo. That let me get straight to the point in a single line. But I love to tinker with and combine pseudo-elements, elements and selectors.
I also do like dice. I'm not quite done with D6 (that is, the six-faced, cuboid dice) - and there are plenty more: D10, D12 and D20.
Let the good times roll!


